Matthew 6: 10
"Thy kingdom come, Thy will be done on earth, as it is in heaven."

Search
Close this search box.

Tops

how to make graphic tees

How to Make Graphic Tees : Making Graphic Tees by Using Iron-on T-shirts (2024)

Do you want to learn how to make graphic tees with iron-on transfer paper at home? So, don’t stop reading now! We will be discussing the easiest ways of how to make graphic tees at home by using iron-on transfer paper. Here is the supply list:  Graphic Design Solution: To begin, make a sketch of a design for your t-shirt. To create your t-shirt, you can use a graphic design program like Adobe Illustrator.  Adobe Illustrator, on the other hand, isn’t free. As a result, if you want to develop a simple custom t-shirt design without spending money, you can use graphic design solutions like Canva and PicMonkey than fancier complex programs like Adobe Illustrator.  T-Shirt:  Any plain t-shirt will suffice for this custom print DIY t-shirt, so find your favorite plain t-shirt and let’s get started.  Iron-On Transfer Paper: There are a few things you’ll need for this DIY project, one of which is iron-on transfer paper. You can use Avery fabric transfer paper for this as well.  Here are some of the problems that people may have with Avery Fabric Transfer Paper: Other iron-on transfer paper companies may be worth considering for your own DIY graphic project. Printer: For this DIY graphic t-shirt, you’ll need a printer. A Canon all-in-one color inkjet printer for this job would be great. This printer is one of the most affordable on the market, and it prints, copies, and scans. Overall, it’s not a horrible deal. The iron-on transfer paper, on the other hand, usually can’t  print the t-shirt design very well. Particularly, the black in the custom t-shirt design doesn’t come out with a great output.. Nonetheless, the iron-on transfer paper quality may be a bit dull in the custom print design. So you can’t directly fault the printer until you try different iron-on transfer paper brands.  Pencil: A pencil is not required. Using a pencil, allows you to make a cutting guide, which allows you to gently cut around the design of your fabric without cutting into it.  If you’re concerned about accidentally cutting a part of your custom print design, use a pencil to trace around the image before trimming the excess transfer paper.  Scissors: To clip the surplus transfer paper, use a pair of sharp scissors. Pillowcase: You may get perplexed as to why you would require a pillowcase. After all, this isn’t a custom pillowcase project. The pillowcase acts as a shield between the heat from the iron and the flat surface you choose to transfer the design onto the fabric of your t-shirt’. In addition, the pillowcase gives some padding, which aids in the design’s transfer to the t-shirt. Instead of the pillowcase, you can now use other objects such as a folded flat sheet or a bath towel. In reality, as long as the item provides some padding and covers the flat surface from the heat, it should be fine. Iron: Unless you have a heat press machine, you won’t be able to transfer the design from the transfer paper to the t-shirt without an iron. As a result, add your iron to the supplies list because it’ll come in handy!  Graphic T-Shirts At Home Using Iron-On Transfer Paper Instructions   Step 1: Create And Print The Design Now it is the time to create your personalized t-shirt design with a graphic design solution. It is very simple to make any Halloween custom t-shirt design “Witch Better Have My Candy” using Canva. This design will take you less than ten minutes to complete. You can use other programs, such as Adobe Illustrator or Microsoft Word. It’s time to print your own t-shirt design after it’s been designed. Before printing your t-shirt design on transfer paper, make sure you select the mirror print option in the print window — this is a step you cannot skip. If your printer doesn’t support mirror printing, use your computer’s paint application to flip your custom t-shirt design horizontally.  Step 2: Trace And Trim The Design Using a pencil, trace the design, then carefully trim the excess iron-on transfer paper with sharp scissors.  You can skip tracing if you accept that you won’t cut into the pattern unintentionally. Instead, simply trim the excess transfer paper with a pair of scissors.  Step 3: Select A Flat Surface To Iron Transfer The Design Onto The T-Shirt For transferring the design onto your t-shirt, you’ll need a flat surface. As a result, make your DIY graphic t-shirt on a flat, uncluttered surface.  Tables are ideal for this type of work. However, use a pillowcase or a folded flat sheet to protect the table surface. Because you want to prevent hurting the table’s surface when transferring the design to the t-shirt. Step 4: Iron The T-Shirt To Prepare The Surface For The Transfer Before attempting to transfer the design onto the shirt, iron the t-shirt to generate a heated and wrinkle-free surface that aids in the design transfer. It will remove any moisture that could hinder the design from being transferred to the t-shirt.  Step 5: Iron Transfer The Design Onto The T-Shirt This is the exciting part you’ve been waiting for! It’s time to iron the design onto the t-shirt once and for all. The length of time it takes to iron the design onto the t-shirt is determined on the type of transfer paper used. However, applying enough heat and pressure to the design should help it stick to the t-surface shirt’s readily. Setting the iron to the highest temperature with no stream for roughly four to five minutes should do the trick in terms of time. However, to be on the safe side, follow the brand’s guidelines to ensure you have the best chance of making the best DIY custom t-shirt print possible. Step 6: Let The T-Shirt Cool Down For A Few Minutes After ironing the image onto the t-shirt, all you have to do now is peel the transfer’s paper backing away to reveal your masterpiece! You must resist

How to Make Graphic Tees : Making Graphic Tees by Using Iron-on T-shirts (2024) Read More »

how to make off shoulder tops

How to Make Off Shoulder Tops : 3 Ways of Making Off Shoulder Tops in 2024

Are you looking for some off shoulder tops and to style them in different ways or willing to know how to make off shoulder tops by yourself?  In this article we will discuss how to make off shoulder tops in three 3 different ways. After reading out the whole article you will get to know how to make off shoulder tops professionally. Off shoulder tops are so in trend nowadays. So, let’s discuss the ways. Method 1 Modifying a Fitted T-Shirt 1. First of all, Find a T-shirt that is well-fitting for you. If the shirt isn’t tailored, it will sag around your shoulders when you’re wearing it. Now, 1 inch (2.5 cm) above where you want the hem, draw a line across the shirt. Place the shirt on a flat surface and determine the location of the top hem. Draw a line across the shirt, 1 inch (2.5 cm) above the spot, with a chalk or pen. For the hem, you’ll need an additional 1 inch (2.5 cm).  2. Make a cut into the line you traced. Cut the shirt straight across with a sharp pair of cloth scissors. Be sure to cut through all layers of fabric while cutting.    3. Half inch fold and press the top edge into the shirt (1.3 cm). Later with an iron, fold the top cut edge down by half inch (1.3 cm) and press it flat. To get a clean hem, repeat this move one more time.  4. Use a similar thread color to sew the hem down. Pick a thread color that goes with the fabric. Sew as close to the inside folded edge of your hem as possible. If necessary, use a stretch stitch. You may also sew the fabric with a straight stitch when pulling on it. While wearing the shirt, this will cause the thread to stretch.  Method 2 Modifying a Button-Up Blouse 1. Select a blouse that is three or four sizes bigger than your usual size.The shirt should be loose enough that you can put it on and take it off without having to open the buttons.  2. Put on the shirt and draw a line where the top should begin. Later cover the top few buttons on the shirt and put it on. Sew a sewing pin through the front of the shirt and each sleeve where the top hem should be.   3. Remove your shirt and change your pins. Remove the shirt from the body, close the buttons,and lay it flat. To ensure that the pins are aligned, use a ruler, measuring tape, or straight edge. If the pins aren’t lined up, switch them up or down until they are.  4. Next, 1 inch (2.5 cm) above your pins, cut the top of the shirt off. If necessary, draw a cutting line with a fabric pen or chalk first. Break through both layers of the shirt with fabric scissors, 1 inch (2.5 cm) above your pins. When you’re done, remove the pins. Cut in half inch (1.3 cm) slits into the cut edge where the curves are if the top hem is curved.  5. Fold and click the top hem twice for a total of half inch (1.3 cm). Half inch fold in the top cut edge of the shirt (1.3 cm). With an iron, press it flat, then fold it down another half inch (1.3 cm). Once more, use an iron to flatten it out. On the inside of your shirt, this will result in a nice, neat hem.  6. Sew the hem down, leaving a 1 inch (2.5 cm) gap for the elastic to be inserted. Start sewing in the back of the shirt, as near to the inside folded edge as possible. To insert the elastic, leave a 1 inch (2.5 cm) distance between the first and last stitches.  7.  Insert the elastic into the 1 inch (2.5 cm) gap with a safety pin. Cut a long piece of elastic that will wrap around your shoulders. Place a safety pin into the 1 inch (2.5 cm) gap in the top hem of your shirt after clipping it to the elastic. Push the elastic through the top hem with the safety pin until it comes out of the gap.   8. After that, try the shirt on by overlapping the elastic ends. Overlap the elastic ends by 1 to 2 inches (2.5 to 5.1 cm) and secure with a safety pin. Try on the shirt to see if it suits you well. Remove the shirt and, if necessary, tighten or loosen the elastic. 9 . Sew the elastic to the crack, then tuck it in. Remove the safety pin and secure the elastic with a sewing pin. Remove the sewing pin after sewing 3 to 5 times around the elastic with a zigzag stitch on your sewing machine. Reposition the elastic in the 1 inch (2.5 cm) gap. Sew across the gap after pulling on the top hem. Because of the elastic, the top hem would be scrunched up. Method 3 Sewing from Scratch 1. Firstly make your pattern based on a folded fabric mat. Fold a lightweight woven fabric sheet in half. Using a piece of chalk or a marker, draw a rectangle. The rectangle should be about 1 inch (2.5 cm) longer than the length of your desired top. The distance should be the same as the diameter of your bust. 2. For the armpits, add curves to the top corners. In each top corner, draw a curve. Certainly make the curve 3 inches (7.6 cm) from the corner at the top and 6 inches (15 cm) from the corner at the bottom.  3. Make a pattern out of your fabric and cut it out. Make sure you’re cutting through both layers of fabric with sharp fabric scissors. Seam allowances are already included in your pattern, so there’s no need to include them.   4. Right sides facing in, pin and sew up the sides of the bits. Right sides facing

How to Make Off Shoulder Tops : 3 Ways of Making Off Shoulder Tops in 2024 Read More »

how to make tunic

How To Make Tunics : Necessary Steps of Making a Tunic in 2024

Do you want to know how to make tunics?  As an entrepreneur of a clothing fashion brand, you may be willing to know how to make tunics.   In this article we will describe all the necessary steps that will help you to know how to make tunics.  A method for making a simple tunic from a single piece of fabric is shown below.  The pattern is suitable for both women and men of average height. The tunic can be made in a variety of lengths, with or without gussets, and with or without a neckline to fit your preferences. A simple round or keyhole neckline with a facing is defined in this pattern. Above all you’ll need chalk, a measuring tape, pins, fabric, matching thread, and fabric scissors to finish the tunic.  You can use a washable fabric, ideally one made of natural fibers like cotton, linen, or wool. Certainly cotton is the cheapest and simplest to come by, and it’s probably the best place to start. Further linen is more period and very comfortable, and wool or wool blends are excellent for warmth. To figure out how much to buy, multiply measurement #1 by 20cm. Cotton and linen fabrics shrink, so if you have the time, pre-wash your fabric (and always air dry). Some fabrics are already cleaned. Choose a white, dark or bright-colored fabric.  You’ll need to make some decisions about the style of your tunic before you begin. There are some of them: After that, you’ll need to take a few quick measurements. You may want to seek assistance with any of them. Fill in the blanks in the table below with your measurements.  1.       Mid-shoulder to the bottom of the tunic’s desired length (floor is good for women, mid-thigh, knee or calf length for men).  2.       Biceps circumference  3.       From the center of the chest to the wrist (or a shorter length if you don’t want long sleeves). We typically work from the base of the neck to the wrist, following a bent arm. 4.       Measurement of the chest (around widest part). 5.       From the mid-shoulder to the waist.    Measurement Alter this measurement New measurement New name #1 _cm #1 minus #5 plus 2 cm _cm A #2 _cm Halve #2, add 7cm _cm B #3 _cm #3 plus 2 cm _cm C #4 _cm Quarter of #4 plus 4.5 cm _cm D #5 _cm Remains the same _cm E Drawing and Cutting the Tunic  Place the fabric length on a table or the floor. To make the cut edges meet, fold the fabric in half across the center. Further smooth out any folds or wrinkles. The fabric should now be folded lengthwise so that the selvedges (clean edges) meet. The fabric should be folded into quarters neatly. The shorter of the two folded edges will be referred to as the “Top” edge, while the longer fold will be referred to as the “Centre.”  Using chalk and a measuring tape, make some marks on the cloth. In a few places, measure down from the top edge by measurement B, and link the marks to form a straight line. This is how the sleeve is made. Label the wrist line with measurement C, measuring from the center fold out to the bias side. If the measurement doesn’t match on the fabric, make a note of how far it’s short and multiply it by 4 cm (which equals ______cm). You’ll need an additional piece of fabric that’s this long and as big as the sleeve to join it on. If you want the sleeve extension to join at the bicep rather than further down, the extensions will need to be much longer and the tunic sleeves will need to be cut much shorter. The extension must also be extended by 2cm. You may also make the tunic slightly narrower at the wrists or flare out at the elbows. Next, take measurement D and measure out from the centerfold in many positions. Only the upper part of the cloth, down to the waist, needs to be marked (measurement E). Join the dots together. To create a nice underarm curve, round off the corner where this line meets the arm line (see diagram).  Measure down from the top in many places using measurement E, and attach the marks to form a waistline. To make a hemline, measure down from the waistline straight down by measurement A. A, 2cm from the edge, measured down from the end of the waistline by A, both straight down and bent so that the hem almost reaches the bias edge of the fabric (see diagram for what we mean).  Make a curved hemline by curving the line. Smooth out the side seam so the waist isn’t at a sharp angle. A continuous curved side seam should be present. Cut along the hemline and side seams of the tunic, running all the way to the wrist. If you need to cut out an extra sleeve piece from the leftover fabric, now is the time to do so. Neck Hole Start by measuring a comfortable circle that you can fit your head into if you need to make your own (it should be a bit bigger than your head circumference). To clarify this measurement refers to as F. To make a basic circle, multiply the circumference by 6.28 to get the radius, subtract 2 cm for a seam allowance, and cut out a quarter circle while the fabric is still folded. Sewing the Tunic  Both the facing and the neckline should be open. The facing should be pinned to the inside of the tunic if you want it to end up on the outside. The neck holes should be the same. Sew 2cm from the edge after pinning. If you’re making a keyhole neckline, sew the neckline about 3mm from the slit in the slit area—this might require some assistance.

How To Make Tunics : Necessary Steps of Making a Tunic in 2024 Read More »

how to fold tank tops

How To Fold Tank Tops : Folding Guidelines Step By Step (2024)

Many people face problems about folding tank tops. They do not know how to fold the tank tops properly. Are you also one of those people who is suffering from folding a tank top? Here you will get to know how to fold a tank top properly.  In the fashion world tank tops are one of the most demanding and necessary clothing that can be worn as single or can be worn under any see through or transparent dresses. But many people find it difficult to fold the tank top in a right way to store it.  There are some easy ways that you can fold a tank top. You have many options like – you can make a classic fold, you can make a quarter fold, you can make a square fold or you can just roll your tank top up without folding it in a certain way. What type of method you are choosing will be resulting in a neat and wrinkle free garment that will be ready to store.  Method 1 of 4 How To Fold Tank Tops Classically  1. First you have to spread the tank out facedown. Then lay your tank top on a smooth surface which must be flat. Like a table or floor.  2. You have to fold both sides lengthwise into the center. Then bring the left edge in so that it may align with an imaginary line that will be running vertically through the center line. The tank top must get a look like one long rectangle. The edges of the top should be in the middle.  3. Fold the tank in half widthwise. You have to bring the bottom of the tank top up across an imaginary line running horizontally through the center of the top. Then align the bottom edge of the tank with the top so that you can make a nice square.  4. Fold thin straps behind the tank. When you see that the thin straps are sticking out above the neck of the tank, you have to fold them back behind the fabric. Thick straps may stay as is.  Method 2 of 4 How To Fold Tank Tops Having Quarter Fold 1. Firstly, lay the tank top face down. Spread out your tank on a flat and smooth level surface like a counter or bed. Then smooth out the straps as well as any wrinkles. 2. Fold the tank in half lengthwise. Now, imagine that there is a line going through the center of the tank from top to bottom and then fold one half over directly on that line.  3. Fold the tank in half widthwise. First imagine that there is a line running through the center of the tank top from left to right. Then fold the bottom of the tank underneath the top of the tank on that line.  4. Tuck the straps in. Small straps which stick out above the neckline should be folded under so that they may lay flat behind the top. When you are folding a tank with wide straps, you may skip this step. Method 3 of 4 How To Fold Tank Tops Making A Square  1. Spread tank top out face up. Choose a flat and smooth level surface like a table or floor. Wrinkle free the surface if there is any. Spread your tank top out so that it  may  lay flat on the surface.  2. Then you have to fold the top over. Next pinch the shirt at the bottom of the arm holes on the both sides and pick it up so that the top folds in a straight line where you will be holding it. Then lay the shirt down flat so that the neck and arm holes are folded on the top of the rest of the top. 3. You should now fold it in half lengthwise. Pinch one of the bottom corners and the bottom of the arm hole on that same side. Then you have to fold the fabric in half lengthwise down the middle so that the shirt may get a perfect rectangular shape.  4. You have to fold the shirt in half widthwise. You just fold the bottom of the shirt in half underneath the top of the shirt.  Then you must make sure that the bottom edges and the top edges must be aligned to make a neat square. Method 4 out of 4 How To Fold Tank Top Rolling It Up  1. Select a flat level surface like a table, wrinkle free bed or floor or a countertop. Then you have to spread the straps of the tank out so that the top may lay down in a flat surface. 2. Fold the tank in half lengthwise. Assume that there is a straight line running through the center of the shirt from the top to the bottom. Then fold one half over directly on the same line so that the tank is folded in half.  3. Next you have to roll it from the top to the bottom. This step will keep the straps or shoulders tucked in so that it may be nice and clean.  Tips These are the steps on how to fold tank tops. Now you can follow these simple steps to fold the tank top easily step by step. If you want to manufacture tank tops, we’ll suggest Beautiful Connection Group from the USA. BEAUTIFUL CONNECTION GROUP is a professional wholesale clothing manufacturing company in the USA specialized in custom women’s apparels like coats, jackets, tops and dresses. Company grew alongside their customer base. They work to serve you at their best. They maintain the traditional tech experiences and at the same time look for artificial intelligence technology and the development and utilization of machines. BCG has always been working hard, trying to become the best high class women’s wear based in the fashion industry. They have been working with customers all over the world. Their consistent honesty & integrity in

How To Fold Tank Tops : Folding Guidelines Step By Step (2024) Read More »

how to wear off shoulder tops with bras

How to Wear Off Shoulder Tops With Bras : Styling Ideas in 2024

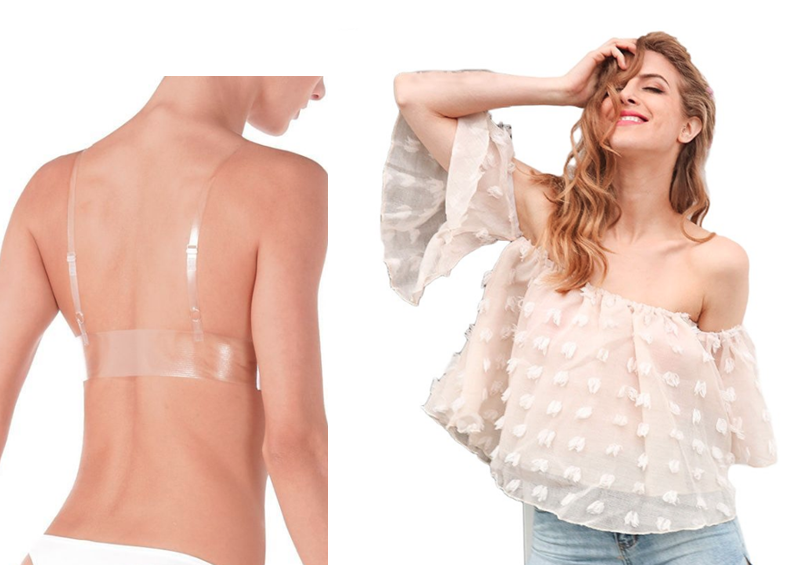
Many people get confused regarding how to wear off shoulder tops with bra! If you are also someone who wants to know how to wear off shoulder tops with bras, it will be the best article for you. We have discussed the styles that you may hold with your personality. Different methods are given below regarding how to wear off shoulder tops with bras!  Off shoulder tops are pretty famous for their cute and elegant look. But, it is a common problem that women get confused which kind of bras they should wear underneath their off shoulder tops. No more worry now! You are now getting the different ideas and methods of how to wear off shoulder bras!  Method 1 of 3  Strapless Bras  1. Use a bandeau for comfortable support. Bandeaus are basically the strapless bras which are made of the jersey material. You can wear these strapless bras easily underneath your off shoulder tops. But remember one thing that for being a very stretchy material it might not give you much support. Specially it happens if you are a large cup size. You can easily find padded bandeaus if needed. One more thing, buy a bandeau which has a large band. Small banded bandeaus can easily fall down underneath your off shoulder top.  2. Try a dedicated strapless bra with more support. Basically strapless bras are made with underwire without having any straps. These come with a back and clasp. So, it would be a better option to wear these bras underneath your off shoulder tops. You have to choose the dedicated strapless bras one size smaller than the regular band size. It will remain secured all day. There is again one more adhesive strip on the front of these bras that will be stuck on your skin way better than the normal bras.  3. Wear a convertible bra to switch from straps to strapless. If you don’t want to purchase  a dedicated strapless bra, just wear a convertible strapless bra with off shoulder tops. These bras will give you support both with shirts and off shoulder tops. Just remove the straps when you are wearing it with off shoulders. You just have to unhook the straps before wearing the bra underneath your off shoulder top. That is it! Make sure that you are keeping the straps in a place that would be easier to find later. You can just use one strap some time with the tops which covers one shoulder. 4. Put on a plunging bra for a deep neckline. If you are wearing an off shoulder top with a deeper neckline, it will be a bit tricky. Try the plunging bra which is perfect for deeper neckline off shoulder tops. Again you can try the stick on plunging bras to wear any off shoulder with a backless top or dresses!  5. Try out an adhesive bra to avoid clasps and straps. Stick on bras that don’t have a back and a strap. You just simply have to stick them onto your breast with the adhesive strips on the inside and then just put on your shirt. Some adhesive bras have hooks in the front and come with an adhesive inside. These will give you push-up effects with a better support. Smaller breast people can choose the silicone adhesive bras which cover the nipples properly with a proper support.  Method 2 of 3 Bras With Straps  1. Wear a bra with clear straps to get the support of a classic bra which does not have a visible strap on your shoulder, go for a clear or transparent strapped bra! Clear straps bras usually are not so visible in the normal light. But under the sun they look a bit shiny. You can get extra hooks for extra support. 2. Show off your straps. There is no universal rule that you must hide your bra straps while wearing an off the shoulder top! You can definitely wear a show off straps bra underneath your off shoulder tops. You can pick one with bedazzled straps, double-wide straps or the colourful straps. That will make your outfit look international. Though the bras with exposed straps are not perfect in formal settings, these are okay in other places.  3. Tuck your straps underneath your armpits. Simply just put your straps down and wear it with your off shoulder top.  4. Clip your straps in the front if your top has coverage around your neck. There are some off shoulder tops that only show your shoulders and these cover the neck. So, you can simply clip your straps in the front.  Method 3 of 3 Bra Alternatives  1. Stick on pasties to just cover your nipples. If you are only worried about showing your nipples, you will find these adhesive pasties really helpful for you. These will stick on your nipples. You can use one pair of pasties 20-30 times until they lose their stickiness. Pasties are easy to wash. Simply wash them with soap and water and let them dry in the air. 2. Give yourself some support with body tape. Cut a 2 feet body tape and peel off the back adhesive. Then simply slide the tape underneath the lower of your bust. You can lift up this to make a bit more support. Now stick the tape underneath the breast and around the back of you. You must use the tape which is made specially for the skin. Otherwise, you will have some skin irritation with the regular tape. Again you can not use the same and used body tape twice!  3. Put on a tube top underneath for extra support. Get a form-fitting tube top matching the colour of your top. Then slide it on. After that you can wear your off shoulder top on it. You should go for a nude tube top in case you are wearing a sheer top.  4. Sew your bra cups into your top for a permanent solution. Take an

How to Wear Off Shoulder Tops With Bras : Styling Ideas in 2024 Read More »

how to make crop tops

How to Make Crop Tops : Best Crop Top Making Ideas in 2024

If you have more interest in crop tops and want to know how to make crop tops by yourself, you are in the right place. In this article you will know how to make crop tops and what else is better than making it by yourself! Crop tops are in the fashion trend for quite a long time. It’s been almost a decade but the crop tops are still in the trend! If you like to wear crop tops, it will be a good news for you because crop tops are really easy to make! You can just make nice crop tops for yourself with your old shirts, tops, leggings or jeggings!  Making An Old Shirt Into A Crop Top  1. First of all, choose an old shirt or any of your sweatshirt to turn it into a crop top. Though you can choose any type of shirt, select one that fits you perfectly. If you want to wear it like a loose top and tie a belt in the front, select a sweatshirt that is a bit loose. Or if you just want to wear it as a fitting one, go with a form-fitting shirt of yours. Choose a shirt or sweatshirt which you are comfortable to cut because it will look totally different after you just finish cutting the shirt.  2. Identify the length of your crop top. Wear the shirt or sweatshirt and stand in front of the mirror. Check the length by folding up the shirt that will suit you. Usually the typical length is a few inches less than your belly button. Still you can choose any length as you want it to wear. Finalize the length and and mark that with a chalk or a fabric pen.  3. Cut the bottom of your sweatshirt to the length that you have chosen. Lay your sweatshirt or shirt on the floor or on a flat surface so that the shirt may lay smooth and even. Now take a scissor and cut the shirt evenly. Make sure that there are no jagged edges. An even cut will give you the best output. 4. Reserve 2 triangular stripes of fabric to secure that shirt, if it is required. Don’t cut all the way to your top at once but before it, try to secure it in the front by creating two triangular stripes of fabric on your shirt. Cut it from the new bottom toward the old bottom of your top for creating the triangles. Here, if you are using any shirt to make your crop top, reserve the fabric of each side of your front edges of your shirt starting and consisting of the button area.   5. Cut along the inside of the collar with fabric scissors. If you want to wear it with the collar, keep that as simple as it. On the other hand, if you want it to be a different neck pattern, just cut it like that under the collar. Be conscious enough about cutting the neckline because, once you cut a deeper neckline, you can’t get the fabric back in case you have to repair it.  6. Cut off your shirt’s sleeves for a sleeveless crop top. If you want to wear a sleeveless crop top, simply you will have to cut the sleeves along the inside of each of the shoulder seams on your shirt. You have to cut a straight line to remove the sleeves.  How to Make A Crop Top With A Pair of Leggings 1. Fold the leggings in half so that the legs are aligned. Firstly, put the leggings on a plain surface so that there is no jagged edge. Now, fold it so the legs are stacked. These leggings will make a very short and fitting crop top. In case, you don’t like these sort of tops then make a crop top using a shirt.  2. Cut a 4 inch (10 cm) diameter circle at the crotch. So, you must use a very sharp scissor to make a circle at the place of the crotch.  3. You can cut the legs shorter if you want to or need. Or else it will create a long, sleeved crop top. Again put your selected leggings on the floor and cut it very nicely without getting any edge.  Sewing A Crop Top  1. Choose 1 yard of fabric that has some stretch to it. For making a crop top (the sewed one), you have to select a stretchy material that would be making out of it a nice form fitting crop top.  2. Measuring the circumference of your bust, waist and upper arms. To create a nice and form fitting top you have to measure perfectly and accordingly to your bust, waist and upper arms. Take a measurement tape to do this.  3. Cut out 2 pieces using the dimensions of your bust, waist and your desired crop top length. You have to fold the fabric in half and draw a rectangle on it which is half of the width of your waist measurement on the other side. The rectangle must be in the length of the distance between your bust and waist.  4. Cut out 2 pieces for the 2 sleeves. Draw a rectangle on the folded part which is the total of your sleeve’s size.  5. Sew a zigzag stitch to secure the sides of the two body pieces. Stack on the 2 body pieces on the back side and sew a zigzag stitch .  6. Fold each of the sleeves and secure them with a zigzag stitch. By folding the sleeves to the back side, stitch them to the raw edges.       7. Hem the edges of the sleeves and body if desired. Mostly hem is not required. But still if there is any material you are using that needs hem, just hem to the edges.   8. Attach the sleeves to the sides of the crop top. Turn the body of your crop top inside out

How to Make Crop Tops : Best Crop Top Making Ideas in 2024 Read More »