“How to make leggings?” Do you have the same question?
It may seem to you very difficult to make leggings but you can easily make leggings by yourself at your home!
Do you want to know how to make leggings at home? Well, in today’s writing we are going to show you how to make leggings simply by following a few easy steps.
Let’s begin!
Part 1-Gather All Necessary Materials
First, select your fabric. Leggings are ideally made with a stretch fabric, such as stretch jersey, spandex, rayon, lycra, or another type of stretchy fabric. Depending on your size, you’ll need 2 to 3 yards (1.8 to 2.7 m) of cloth. You’ll just need roughly 1 yard (0.91 m) of cloth if you’re making leggings for a baby or toddler. You may also use a printed t-shirt as the fabric for baby and toddler leggings. Make sure it’s a garment you’re willing to cut up. You can recycle an old t-shirt or get it in the sale.
Secondly, look through your closet for an old pair of leggings. You’ll also need an old pair of leggings that fit you to make the template for the leggings. You can draw outside of the edges of the leggings’ to make them larger if they’re a little smaller than you want them to be.
Thirdly, for the waistband, get some elastic. A piece of elastic that is long enough to wrap around the waist of the person who will be wearing the leggings. You have the option of using a narrow piece of elastic, such as 0.5 inches (1.3 cm) wide, or a bigger piece, such as one that is 2 inches (5.1 cm) wide. Because the elastic will be covered in the waistline, so you can use any color.
Now, for making a pattern, take paper and a marker. To design your own pair of customized leggings, you’ll need to first create a pattern. You’ll need some paper and a black marker to sketch the outline of your folded leggings. You can use a large roll of craft paper to make leggings for adults, or a large piece of construction paper for leggings for babies or toddlers.

Part 2-Make A Legging Pattern
First of all, fold your leggings and place them on top of your paper. Spread out the pattern paper on a flat surface. Then fold your leggings lengthwise in half and put them down on the paper. Align the leggings’ outside edge to the paper’s edge. This edge does not require tracing. Use your measurements if you’re not using an old pair of leggings. Use your actual body measurements if you are using a non-stretchy fabric. For super-stretchy fabrics, subtract approximately 10 cm from each measurement to ensure that the leggings fit properly.
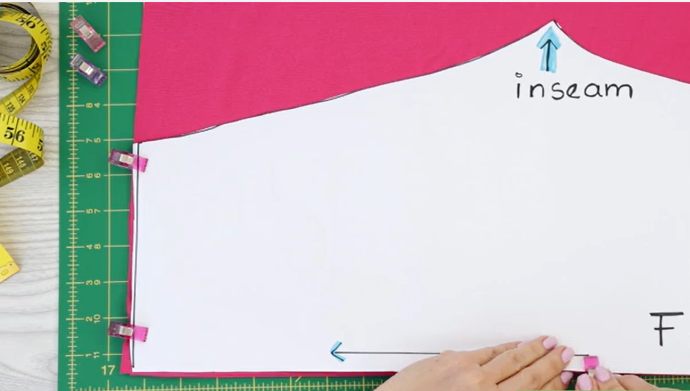
Now measure 1 inch (2.5 cm) from the bottom of the leg for the hem, 2 inches (5.1 cm) from the top of the waistband for the elastic band, and 0.5 inches (1.3 cm) from the inseam of the leg.
Trace about 1.5 inches (3.8 cm) from the edge of the leggings if you wish to make a larger pair.
After that, make a mark on the pattern and then cut it out. Make a mark on the paper to indicate where the leggings’ inseam will be. Draw arrows on the design to indicate which parts of the pattern must line up with the fold. Cut the pattern sections using a sharp pair of scissors. Your leggings pattern is now complete.
Part 3- Use the Leggings Pattern
Now you have to fold the fabric in half lengthwise twice. Right after cutting out your pattern, take your fabric and fold it in half lengthwise 2 times. Now you can cut out both leg pieces at once. Line up the fabric evenly. You can also cut 2 pieces separately by folding your fabric twice and cutting along the waist, inseam, and bottom of the legging pattern twice.
To place the pattern on the folded edge, fold the fabric in half. Lay the pattern over the folded fabric so that the outside of the pattern leg lines up with the folded border of the cloth. The inseam portion of your pattern should be on the inside of the fabric’s edge.
Now, cut the fabric along the top, bottom, and inseam using a pair of scissors. Cut along the top, bottom, and inseam of your pattern with a rotary cutter to sew leggings. Don’t cut along the folded edges of the fabric.
Part 4-Sew All the Pieces Together

First, pin the leg’s inseam together. Take your fabric scraps and sort them out. Fold one piece in half lengthwise so that the inseams of the legs are aligned and the printed side of the fabric is on the inside. Place pins along the leg’s inseam, but not over the crotch area of the legging piece. After you’ve pinned up one piece’s inseam, do the same with the other.
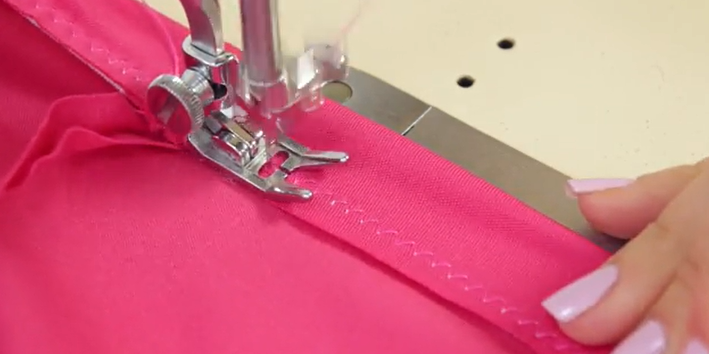
Now, sew the inseam together. After you’ve completed pinning both legging pieces along the inseam, sew a zigzag stitch along the pinned regions with a sewing machine. Sew around 0.5 inches (1.3 cm) out from the inseam’s edge. Sew straight up to the crotch area. As you sew, remove the pins. When you’re finished, trim the extra threads.
Place one leg inside another. Turn one of the leg pieces right side out once you’ve finished stitching both leg pieces along the inseams. Then, place this piece inside the piece with the print side facing out. Ensure that all of the seams are aligned as well.
Sew around the edge of the crotch seam. With one pant leg inside the other, sew along the crotch area going from one side of the waistband to the other. This will connect the 2 pant legs and create the seam for the crotch. Trim off any excess threads when you finish sewing.
Sew the crotch seam along the edge. Sew across the crotch area, from one side of the waistband to the other, with one pant leg inside the other. The crotch seam will be created by joining the two pant legs together. When you’re through stitching, trim any extra threads.
Make a right-side-out turn with the pants. Sew all the way around the waistline, leaving a 0.5-inch gap between the elastic and the fabric (1.3 cm). Remove any excess threads and press on the elastic slightly as you stitch to make a nice waistline.
Sew along the edge of the elastic by folding it over. Cut off any excess elastic after sewing the elastic strip into the waistband and discard it. Then, to hide the raw (cut) edge of the fabric, fold the waistband into the pants. Then, to secure the waistband in place, sew a zigzag stitch down the inner edge and finish the waistband. When you’re through sewing, trim any extra threads.
Hem the leggings’ bottoms. To hem the bottom of your leggings, fold the fabric up and into the pant leg at the bottom of each leg. The raw edge will be hidden, showing only the print side. Then sew a zigzag stitch along the pant leg’s an inside edge. Repeat for both legs. This will finish your leggings by securing the hem on the bottom of the legging pant legs.
When you’re done sewing, trim away any excess threads.
Your legging is complete! Really easy, right?
Well, these steps were really easy. But if you don’t want to take any hassle, you will get so many readymade leggings available on the market. But what if you have the option to make customized leggings in a hassle-free way! Beautiful Connection Group is there to help you! Beautiful Connection Group is one of the top-rated wholesale clothing manufacturing companies in the USA that make all types of customized clothing items for women at a reasonable deal. They never compromise on quality. You can surely check their website to know more about them.