
Have you ever wondered and wanted to know how to make a kimono?
Kimonos are one of the most fashionable clothes nowadays. This is fashionable and trendy and can be easily paired up with any top. You can style with a simple kimono in different ways!
Kimonos are really very trendy and fashionable to wear. Also girls love to fashion with different sorts of clothes. So we have decided to make a basic kimono jacket to pair with jeans.
Are you willing to know how to make a kimono?
Well, we are simply sharing the steps on how to make a kimono below!
All you have to do is just go through the whole article to know how to make a kimono by following a few easy steps!
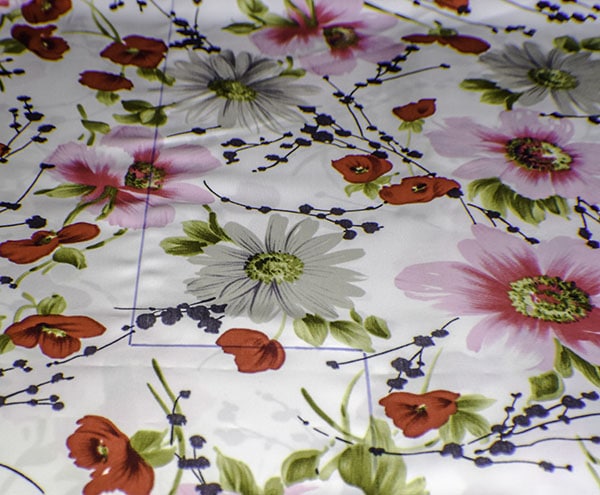
Like most of the sewing projects, we wanted this to be a quick and easy project that anybody could do. We looked around for a quick and entertaining kimono craft to offer and eventually landed on one we made ourselves using a few basic measurements. This project takes approximately an hour to complete and the results are fantastic. We don’t sew as often as we used to do before, but we still have a hard time finding things we like, and this casual little kimono jacket was one of them. When we saw this wonderful floral fabric based kimono, we knew it would be ideal for our kimono project. The fabric is a midweight polyester, however a lighter weight fabric might be used instead. This fabric that we used was chosen because we liked the color and design and didn’t mind that it was a little heavier than we had expected. While making a kimono, just bear in mind that you want something with a little drape and that is somewhat light in weight. Because a light weight fabric would make the best kimonos.
What You Will Need : How to Make a Simple Kimono Jacket
- 2 yards of your favorite fabric
- Sewing Supplies
- Standard Sewing Supplies Measuring Tape
Step 1 : Measure
You have to take four measurements.
a. From end to end of sleeve
b. Length of armhole
c. Bottom of the sleeve to the end of the kimono
d. Length of the sleeve from the end to the “body” of the kimono
We used the following measurements while making a kimono. You will get to see the fabric that we used, cutting and other suggestions also the final outcome of our self made kimono. So the measurements that we are representing below were for us. Just go through this, you will get an overall idea for making a kimono and its measurements!
a. 38″ (From end to end of sleeve)
b. 14″ (Length of armhole)
c. 16″ (Bottom of the sleeve to the end of the kimono)
d. 4″ (Length of the sleeve from the end to the “body” of the kimono)
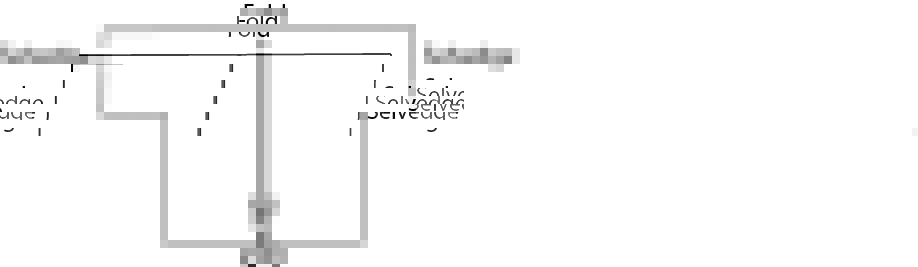
Step 2 : Mark the Fabric
First of all you have to fold the fabric lengthwise in half. To put it another way, make sure the selvedges on both sides of the cloth are aligned and the new fold is at the top. The original fold is in the middle of the fabric piece. Transfer your measurements to the cloth using a Frixion Heat erasable marker which you will easily find available in any of your local markets. But if not, you will get it available in any Amazon store. To make the kimono’s top, we started in the center and measured 19′′ on either side of the fold. We then took measurements for the kimono’s sleeves and torso, as illustrated.
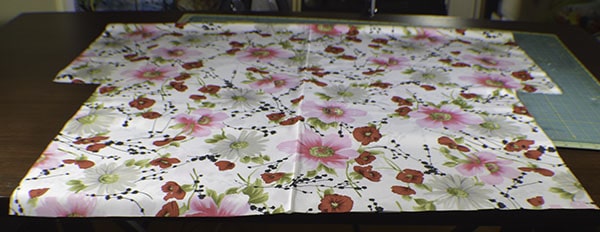
Step 3 : Cut Out Your Kimono
In this step, you have to cut out your kimono along the lines you’ve just drawn on your fabric as shown in the picture below. You will have a piece that looks like this :

Step 4 : Cut Out The Front of Your Kimono
After that you have to cut the front center of the kimono through the top layer only. Also make sure to leave the back uncut.
Step 5 : Sew the Seams
Now in this step, you have to stitch the side and underarm seams with right sides together and a 0.5′′ seam allowance. These seams can be serged for a completed look if you have a serger. Otherwise, simply push the seams open.
Step 6 : Stitch the Raw Edges
Be concerned regarding the sleeves, front, and bottom because that will all have raw edges. You can hem the raw edges by folding them under 1/8′′ then another 1/8′′, but we usually prefer to use a rolled hem foot for doing these kinds of small hems. It becomes a lot easier using the rolled hem foot. If you have never used one before, it can be a little fiddly at first. But with a little experience, it becomes so easy that you will find it as your second nature. If you’re not sure how to use a rolled hem foot, watch the video below. A serger could also be used to make a serged rolled hem.
How To Sew Rolled Hems with the Narrow Hemmer Foot Follow this video. You will get a clear idea.
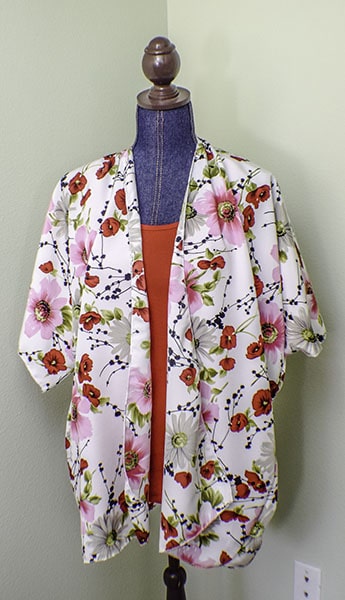
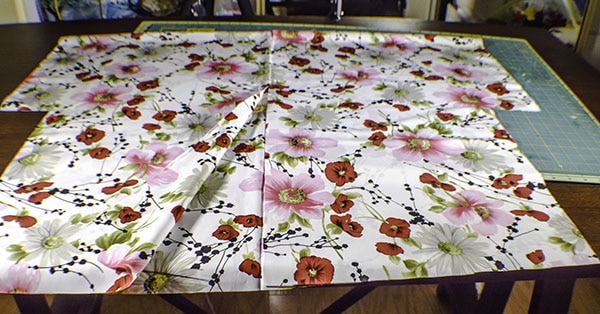
Now look at our final output. The kimono we made with a floral fabric.
Doesn’t it look really nice?
So these are the easy steps that you can follow. By following these simple steps you will be able to make a kimono by yourself.
But, if you don’t want to take any hassle and want to make a private label nice kimono in bulk, you can definitely go for some kimono manufacturers! You will get amazingly stylish and new trendy designs of kimonos at Beautiful connection group. This is one of the best clothing manufacturers in the USA. You will get a nice variety of ladies clothing collections from them. They provide wholesale supplies to their customers basically. They have a wide range of kimonos as well. If you don’t find anything of your choice, you won’t have to worry at all. Because Beautiful Connection Group takes customized orders. So, you will get your own customized private label kimonos from them.