
Have you ever wondered how to make tank tops? Tank tops are one of the most common and comfortable women’s wear. You can easily make your own tank tops if you know the actual procedures for making them. Well, today we’ll share a few easy steps on how to make tank tops. Let’s start!
How to Make Tank Tops with Easy and Shortcut Method
Drafting The Pattern

Firstly, grab an old tank top. Look into your closet for a tank top that fits you nicely already. You can use this tank top as a basis to create your own pattern.
Secondly, ensure simplicity. You’ll need to design the pattern from another basic top as you’re making a tank top. That is to say, you should avoid tank tops with features like darts, pleats, draped folds, or other details.
It will be simpler to create this pattern if you start with a woven tank top, but you may also use a stretchy knit if necessary. But it’s better to avoid cotton fabric to make such form-fitting tank tops.
Folding the Tank in Half

First of all, fold the tank in half. Along the vertical middle, fold the tank top in half. Put it on top of a sheet of newspaper, brown drafting paper, or a similar-sized piece of paper.
You have to fold the tank top in half at the back so that the front neckline is still visible. While creating the back pattern piece, it won’t matter much. But while creating the front pattern piece, it’s a big matter.
Adding a Seam Allowance to the Outline
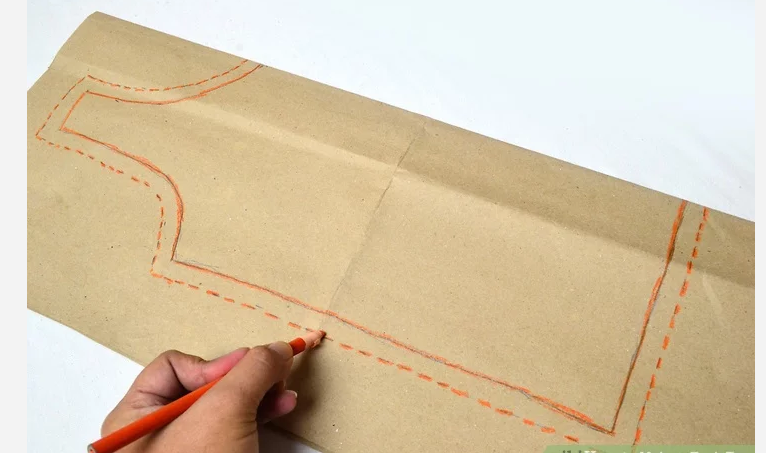
Trace all the way around the tank top’s outline. Create a second outline and place it 1/2 inch (1.25 cm) outside the first one. Your seam allowance will be made up of the additional 1/2 inch.
If you’re making a woven tank from a knit tank’s pattern, add an additional 1 inch (2.5 cm) to the outside and 1/2 inch (1.25 cm) to the inside seam allowance. If you are creating a knit tank from scratch or if you decide to draft from a woven tank, this step is not necessary.
Tucking the Upper Back

Transfer the folded tank to another paper piece. Fold the back neckline between the straps gently, then draw the outline once more, adding an additional seam allowance of 1/2 inch (1.25 cm). You will typically need two distinct pieces because the back neckline is typically higher than the front neckline. You should be able to trace around the front neckline after tucking the back neckline inside the shirt. Make sure the edge is still there once you’ve folded the neckline in. If folding the neckline causes the rest of the tank’s outline to be distorted, unfold it once more and trace around it.
Cutting Out the Pattern Piece
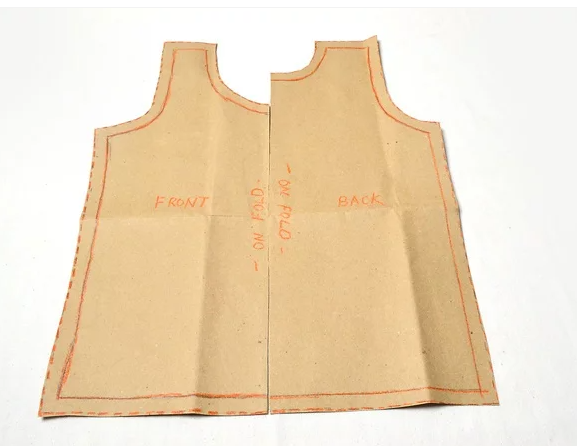
Using scissors, carefully cut out both pattern pieces, including the seam allowances. Please label the pieces “Front” and “Back”. Also, mark each pattern piece’s folds.
How to Make Tank Tops in Conventional Method
How to Make Tank Tops: Taking the Measurements
Now you’ll need to know your bust/chest size, armhole depth, neck depth, and neck size in order to create a pattern from scratch. You must also be aware of the length you want.
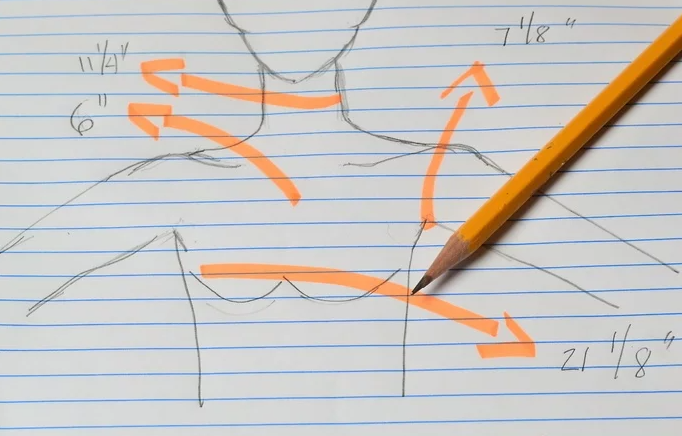
Wrap the measuring tape around the widest area of your chest (for males) or bust (for women) to get your measurements. Keep the tape parallel and tight to the ground. Add 1 inch (2.5 cm) to this measurement if you’d like a little looser tank top; otherwise, use the measurement exactly as it is. After that, draw the measuring tape from the top outside edge of the shoulder down to the middle of the armpit to determine the depth of your armhole. Now place the measuring tape at the collarbone, right where your shirt’s shoulder and neck seams meet, to determine the depth of your neck.
Take an angled measurement down to the center of your bust line or chest line. Meanwhile, wrap the measuring tape around your entire neck, maintaining it parallel to the floor without pulling it too tightly, to determine the width of your neck. This measurement is divided in half. Now measure from the top of your shoulder to the waistband of your pants, or to wherever you’d like the tank to end, depending on your preferred length. As you take this measurement, try to keep your back as straight as you can.
How to Make Tank Tops: Sketching the Frontline
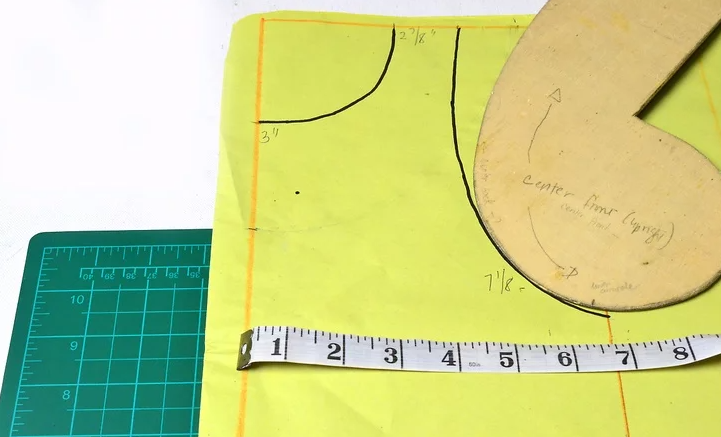
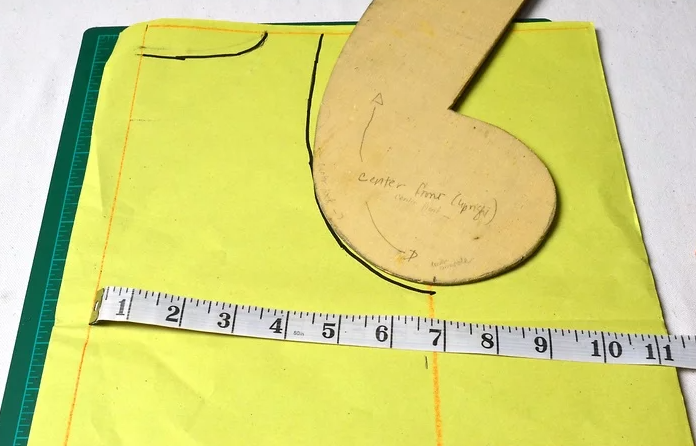
You will need to draw a rectangle the size of half your bust/chest size and a height matching your desired length. Within this rectangle, you will draft the pattern for the front.
Start measuring at the top left corner and go down to the length of your neck depth to make the neck opening. Make note of this. Measure crosswise from the top left corner to a position that is half your neck’s breadth plus 1 inch (2.5 cm). Make note of this. These two spots should be connected by a curved line. The rectangle’s upper left corner should be removed because this line will serve as your neckline.
Depending on how wide you want the straps to be, start at the top of the neckline and measure 2 to 3 inches (5 to 8 cm) along the top. Make note of this. Measure down from the rectangle’s upper right corner to a point that matches the depth of your armhole. Mark this. Between these two spots, draw a line. Your armhole will be here; remove or ignore the piece of the rectangle that is to the top right of this new line.
Now draw a second outline around the first one, placing it 1/2 inch (1.25 cm) outside the first one. You will use this as your seam allowance.
How to Make Tank Tops: Sketching the Back Outline
Draw a second rectangle on a blank sheet of drafting paper with a height that matches your desired length and a width that matches half your bust/chest size. Within this rectangle, you will write the pattern piece for the back.
Make the neck opening depending on how high you want the back neckline to be. Measure down 2 to 3 inches (5 to 8 cm) from the top left corner. (Remember that the front neckline is typically lower than the rear neckline.) Mark this as well.
After that, measure crosswise from the top left corner to a position that is half your neck’s breadth plus 1 inch (2.5 cm). Mark this. Now, draw a curved line connecting these two spots. Here you need to remove the rectangle’s remaining upper left corner. This line will serve as the neckline for your back pattern piece. Using the same method as for the front pattern piece, measure the armholes.
The finished outline should have a seam allowance of 1/2 inch (1.25 cm) all around it.

How to Make Tank Tops: Cutting Out Both the Pattern Pieces
You should use scissors to cut out both pattern pieces along the outside perimeter of the seam allowances. Clearly label each piece “Front” and “Back”. It is also a good idea to mark the fold line on both pieces. The line lies to the left of the pattern, underneath the neckline and opposite the armhole.
Sewing the Top

Onto the fabric, trace the pattern. But don’t take the fabric out of its pins yet. To clarify, before you pin the pattern pieces to the fabric, trace their shapes using a fabric pencil or piece of chalk.

And, now cut out the pattern pieces first if you’re making a tank top. Secure the unfinished edges with a pin. After that, iron it. You should fold the bottom hem up to 1/4 inch (0.6 cm).

So now secure the sides and shoulders with pins. Attach the front and rear using pins. Pin the two pieces together after evenly aligning the two perimeters. Ensure that the edges of both pieces match and that they are both flat. There is no need to pin the remaining edges.

Now sew together the sides and shoulders. Sew along the upper part of the shoulder straps and along both side edges using a seam allowance of no more than 1/4 inch (0.6 cm).
Hem all the remaining raw edges. Stitch the open bottom, neckline, and armholes with a machine. The seam allowances should not exceed 1/4 inch (0.6 cm).
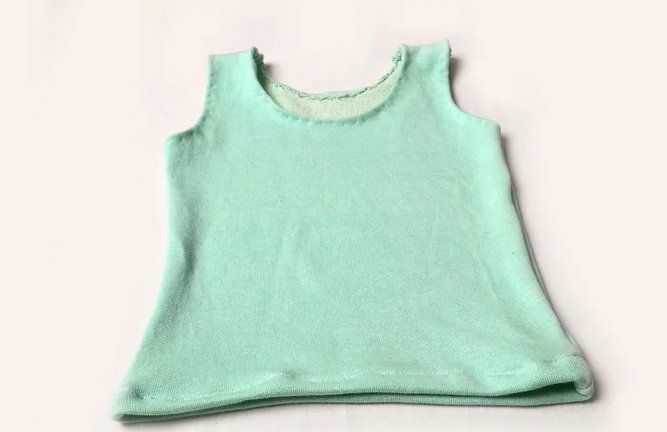
So there your tank top is ready! After finishing all these steps, you will get your desired DIY tank top ready by yourself.
Although we shared a few easy steps on how to make tank tops, you can easily make your own customized tank top. But if you don’t want to go through the hassle or want tank tops in bulk to sell at your showroom, you can purchase these wholesale. From tank tops to any sort of women’s clothing, you will find it at Beautiful Connection Group. Beautiful Connection group is one of the best clothing manufacturers in the USA and sells all sorts of customized women’s clothing. They provide the best quality products at the most reasonable prices. You can check out their website for further details.