
Have you ever wondered how to make skirts?
Skirts are always fashionable since people understand the theme of fashion. From ever since then till now skirts are top of fashion.
Today we’ll show you how to make skirts. We will teach you the easy steps of making a skirt pattern.
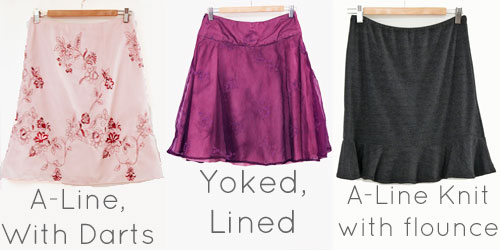
Skirts are the simplest design, to begin with. So get your crafting supplies together: kraft paper or wrapping paper (use the reverse side), a pencil, and a clear ruler. We’ll be drafting and fitting a basic fitted skirt, so you’ll need some muslin (or fabric of your choice). Now we’ll show you how to make all of these skirts in the picture, out of that simple skirt pattern:
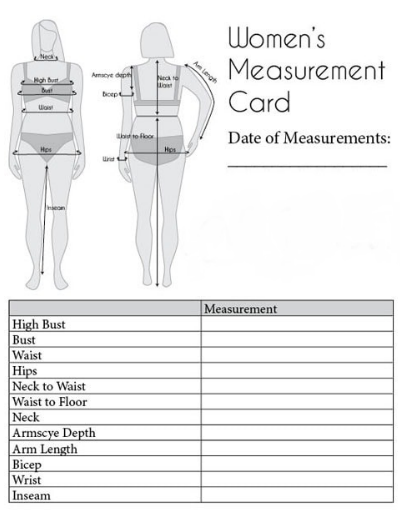
To begin, you’ll need four measurements: your waist, hips, waist to hip length, and skirt length (we’ll use a waist to knee measurement for this). Let’s have a more in-depth discussion.
Waist: This could be your natural waist or the point at which you want your skirt to fall. I prefer to start with the real waist and then alter the design from there.
Waist-to-Hip: To simply measure the distance between your waist and hip, place a sticker on your level with the tape while holding the measuring tape for the waist and hip measures. Alternatively, you can measure by tying yarn around yourself at both levels. This is a measurement that is taken vertically.
Make sure to include the Waist-to-Hip and Waist-to-Knee measurements in your calculations.
Okay, now we’re ready to start drafting. Use kraft paper, the reverse side of a roll of wrapping paper (grid lines are very useful), or tape a stack of printer paper together. Take out your ruler. Make sure you have a pencil, muslin (or scrap fabric – enough to cut out your skirt), and pins on hand as well. You’ll also need a friend or partner to help you fit the muslin, as well as a fabric marker or chalk.
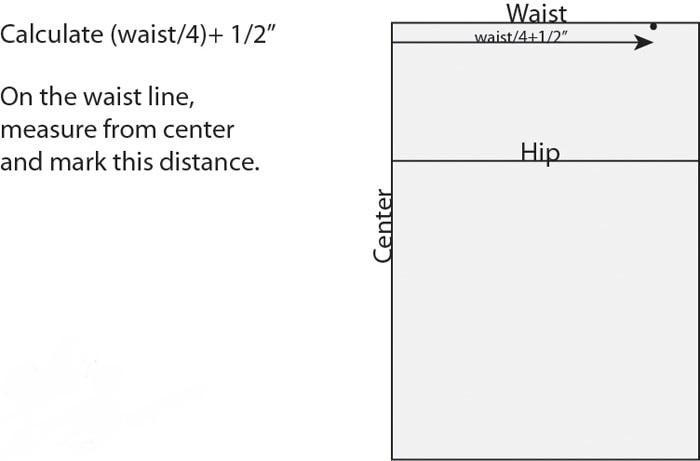
Because we’ll be drawing 1/4 of the skirt for the pattern, you’ll have to do a little arithmetic. Prepare your calculator (or, more likely, your phone)! Start by multiplying your hip measurement by four. Draw a rectangle that is that broad and your chosen length (suggested: waist to knee measurement) tall by adding 1/2 inch to that number.


This curve can be drawn with a bendy ruler or a French curve. Alternatively, a supper platter. Simply make sure that the majority of the curve is in the upper 3′′ or so of the curve, as this is where the body curves the most.

Add side and waist seam allowances, then retrace the pattern and add the center back seam allowance, and your muslin patterns are complete. Cut out the front piece on the fold, as well as two mirrored rear pieces. IMPORTANT: On the muslins, you’ll want to note the hip line.
Pinup one side seam and the center back seam. Then, inside out, put the skirt on yourself. The remaining side seam should be pinned up. You might require the help of a friend. Smooth your hands together from the center seam to the side seam to pin the front darts. The excess fabric should be pinned at the waist. Rep on the opposite side. It’s not difficult to do this on your own.
But at the back, you’ll need your friend or anyone to assist you. Because attempting to pin back darts on yourself will result in pins becoming trapped. And there’s a lot more nasty stuff. So let your friend smooth the fabric in the back and pin the darts in the waist, just like you did on the front.
Let out the pins in the center back seam first, not the side seams, if the muslin is tight around your rear.
The next step is to figure out where those darts will go.
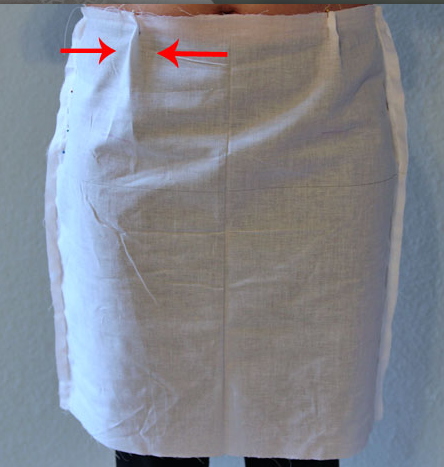
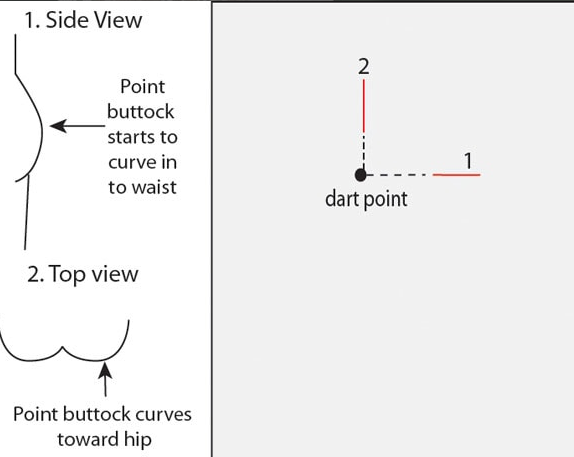
It’s easier to start in the back, and it requires some rear-viewing. Your friend should use the fabric marker or chalk to indicate the spot where your buttocks begin to curve toward your back (mark 1) and when they begin to curve out toward the hip (mark 2). Follow the pictures given below.
You’ll need to perform the same thing in the front, but the curve will be exactly toward your tummy rather than your butt. You might not need front darts if you’re a flat ab exercise queen. Examine your side seams now. Check to see if they’re straight down your sides. If they aren’t, remove the pins and adjust them till they are.

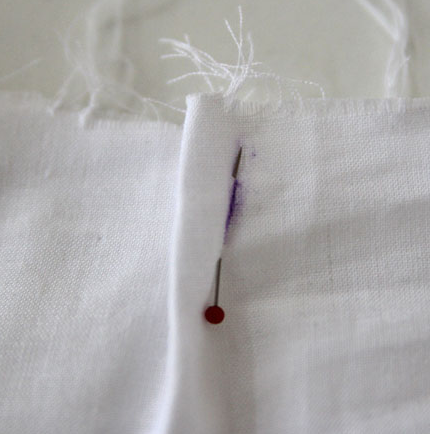
Now, on the side seams and back seam, use your marker or chalk to mark where the pins are. Remove your muslin and unpin yourself down one side. Please excuse your friend and thank them for their assistance; you’re on your own now.
On each side of the dart, mark the pins that hold it in place. After that, you can take out the pins.
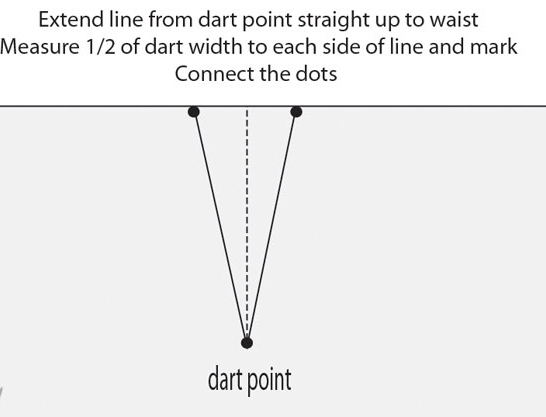
We’ll figure out where the darts end up. The bottom of your dart will be where the lines that defined the curve break on your body intersect. Mark the bottom of the dart with these measurements on your paper template. On the front pattern piece, repeat with the front dart.


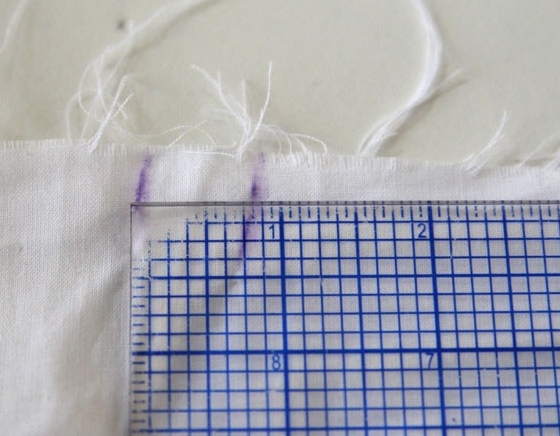
On your muslin, measure the breadth of your darts.
Make a straight line up through your dart point that is perpendicular to your pattern’s hip line.
Mark off your side seams and adjust the seam allowances. Repeat this dart creation for the front piece. It’s a good idea to make another muslin and test this pattern before you cut into the good fabric. Any adjustments should be minor, but any variations can add inches to the skirt.

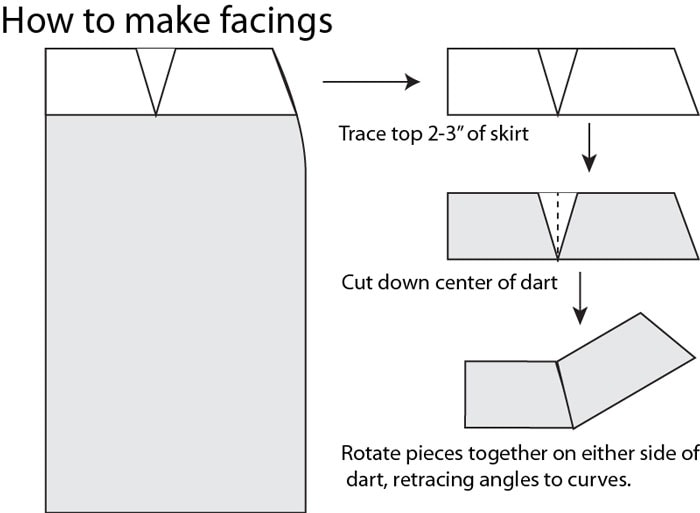
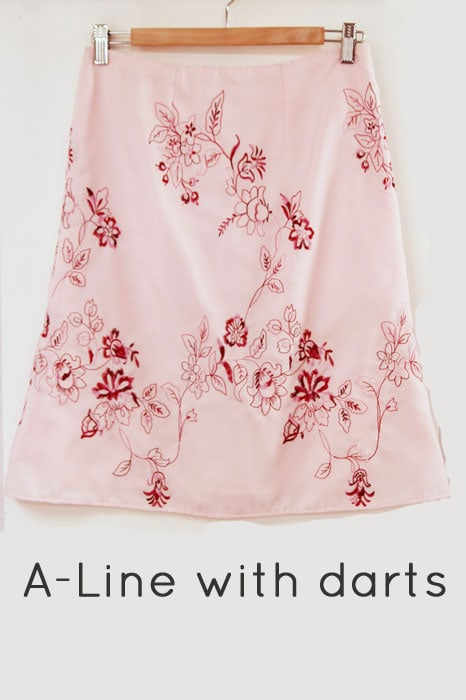
Your facings, like your skirt, will be cut on the fold. There’s no need to add facings because your skirt already contains seam allowances. Sewing instructions for this skirt are as follows:
1. Darts should be sewed back in place.
2. Sew the rear center seam and install the zipper on the seam.
3. Sew front darts in place.
4. Sew the side seams of the skirt and the facings together.
5. Pin facings to the waistband, right sides of the fabric together, stitch around, then turn facing to inside of skirt and press. If desired, topstitch.)
6. Hem
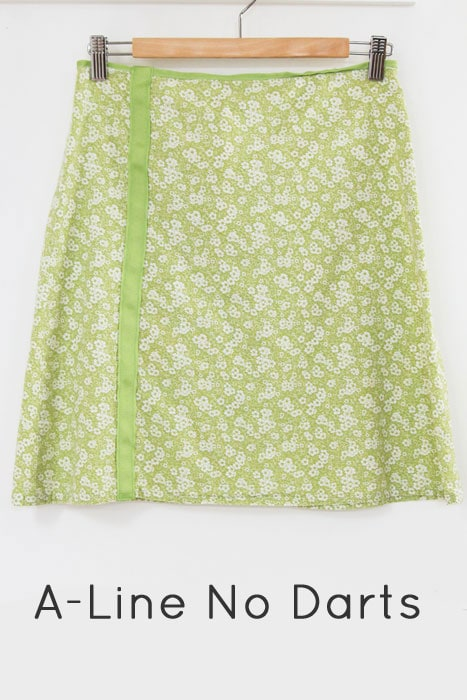
There are no facings on this A-Line skirt we made because it is entirely lined. This is a really straightforward skirt modification.

Sewing instructions for this skirt are as follows:
- Darts should be sewed back in place.
- Sew the rear center seam and install the zipper on the seam
- Stitch front darts in place.
- Sew the skirt’s side seams.
- Steps 1-4 should be repeated with the lining.
- Pin the lining to the waistband, right sides of fabric together, stitch around, then turn the lining to the inside of the skirt and press.
- Both the lining and the skirt should be hemmed.
The following version is also quite simple to grasp if you think about how you build facings and an A-Line skirt.
I also off-centered some ribbon trim for the A-Line above, and I finished the waist with the same ribbon. Sewing instructions for this skirt are as follows:
1. Sew the front decoration in place.
2. Stitch the rear center seam and install the zipper on the seam
3. sew the side seams together.
4. Bind the waistline with grosgrain ribbon or bias tape
5. Hem
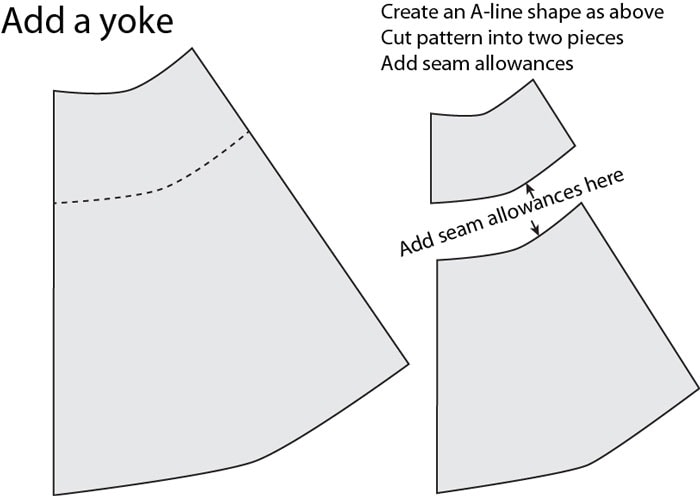
What if you want to add a yoke to your design?

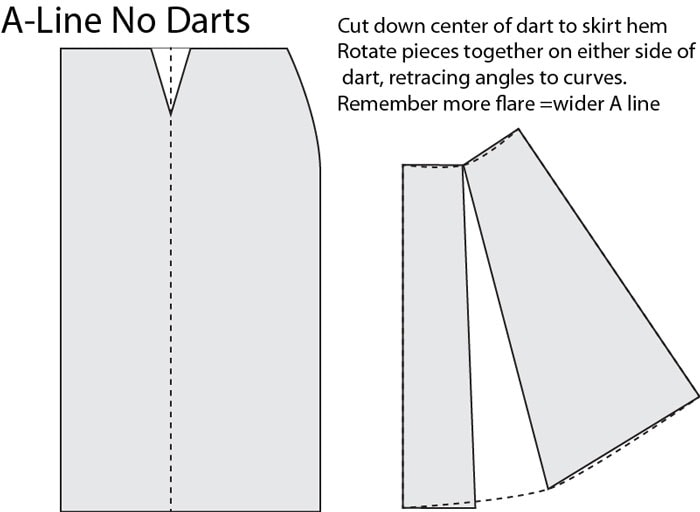
You’ll start by making an A-line form without darts, then cutting the pattern where you want the yoke to go and adding seam allowances.
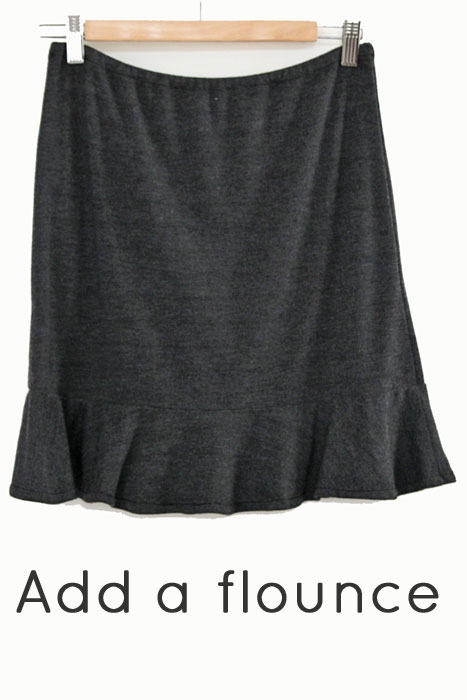
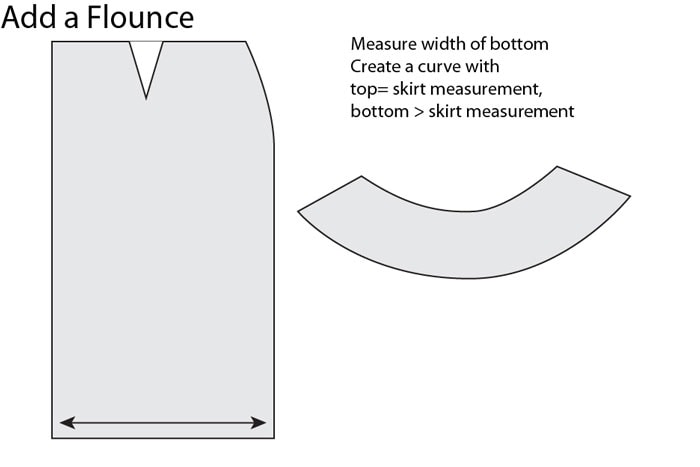
Finally, I’ll show you how to create a flounce. When making this type of skirt, keep in mind that you may want to take away length equal to the vertical length of your flounce so that the overall length of the skirt remains the same.
Sewing instructions for this skirt are as follows:
- Sew the flounce’s side seams.
- Sew the skirt’s side seams together.
- Stitch the rear center seam and install the zipper on the seam.
- Sew a flounce to the skirt’s bottom.
- Sew the facing or lining to the waistband and flip inside out.
- Hem
This method can also be used if you want the bottom half of a yoked skirt to be fuller than the top half but without the need for forgathers. In that situation, you’d measure the yoke’s bottom and use that as the top of your curve, then carve out the bottom.
Alright, that was all about how to make skirts with the easy steps of making different skirts patterns. In case if you do not want to take the hassle by yourself but want some designer and customized skirts then you can go and check out Beautiful Connection Group. Beautiful Connection Group is one of the best clothing manufacturers in the USA. You can make any customized women’s clothing from them.